Posts tagged "automation":
There is no golden configuration - using Cisco NSO services for everything
Using services in Cisco NSO to enable management of the full life cycle of configuration.
1 TL;DR;
Use services in Cisco NSO for everything you configure on your devices.
2 Golden configuration
If you've been in the networking business for some time you'll likely be familiar with the term "golden configuration". A sort of master template for how configuration should look. It brings associations to something that is perfect - like a golden statue on a pedestal.

It is however a flawed idea. There is no such thing as a perfect configuration. Times change and so needs the configuration.
Somewhat similarly is the concept of day 0 or day 1 (ah, an off-by-one error!?) configuration. It's the idea of a configuration you put on the device when you initially configure it. There's usually nothing defined for managing the life cycle of this "day 0" or "initial" configuration and so it becomes outdated on devices that were installed a long time ago.
The name "day 0" has a temporal association as the name implies it is something you only do on the first day whereas in reality it is something you must configure on many days - to be precise; every day that you change that configuration! I prefer to call this "base configuration" as it removes that connotation of "configure once on first day". The device base configuration is a living thing and you must manage its life cycle.
We have to be able to manage the life cycle of configuration, like:
- adding new leaves
- changing value of leaves, lists etc
- removing leaves, list entries etc
For example, today we configure DNS servers:
8.8.8.81.1.1.1
Tomorrow we realize we don't want neither 8.8.8.8 nor 1.1.1.1. We want to replace those entries (in a list) with our own DNS 192.0.2.1. Changing the golden day 0 configuration on disk is simple, we just edit the file and remove two entries and add another but we must then synchronize this change to the device in our network. We must keep track of what we have added in the past so we can send the configuration delta.
3 FASTMAP and reference counting in Cisco NSO
Cisco NSO uses an algorithm known as FASTMAP to reference count configuration items that are written by the create function of services. FASTMAP is one of the foundational pillars of the seamless and convenient configuration provisioning we get with Cisco NSO. We can declaratively define what the configuration should look like and the system will figure out the rest.
In contrast, using device templates, we won't get reference counting which means that removing leaves won't happen automatically. If we have set leaf X in our golden configuration today, pushed it to a thousand devices and want to remove it tomorrow, we have to do that manually.
There seems to be a trend to use device templates for this day 0 / golden configuration style use cases in Cisco NSO and I quite frankly don't understand why. The only reason I see for using device templates at all is because they could be easier to work with, depending on your perspective. Device templates live as part of the configuration in NSO and so it is editable from the NSO CLI. For people with a networking background, this is probably more intuitive than using services and their configuration templates as one has to edit files, create NSO packages etc. However, using Cisco NSO without using services is a complete waste of potential. Get over the hurdle and start writing services for all!
Enable the power of FASTMAP. Use services for everything you configure on your devices.
GitBot - automating boring git operations with CI
Git is super useful for anyone doing a bit of development work or just trying to keep track of a bunch of text files. However as your project grows you might find yourself doing lots of boring repetitive work just around git itself. At least that's what happened to me and so I automated boring git stuff using our CI system.
There are probably all sorts of use cases for automating various git operations but I'll talk about a few that I've encountered. We're using GitLab and GitLab CI so that's what my examples will include but most of the concepts should apply to other systems as well.
1 Automatic rebase
We have some git repos with code that we receive from vendors, who we can think of as our upstream. We don't actually share a git repo with the vendor but rather we get a tar ball every now and then. The tar ball is extracted into a git repository, on the master branch which thus tracks the software as it is received from upstream. In a perfect world the software we receive would be feature complete and bug free and so we would be done, but that's usually not the case. We do find bugs and if they are blocking we might decide to implement a patch to fix them ourselves. The same is true for new features where we might not want to wait for the vendor to implement it.
The result is that we have some local patches to apply. We commit such patches to a separate branch, commonly named ts (for TeraStream), to keep them separate from the official software. Whenever a new software version is released, we extract its content to master and then rebase our ts branch onto master so we get all the new official features together with our patches. Once we've implemented something we usually send it upstream to the vendor for inclusion. Sometimes they include our patches verbatim so that the next version of the code will include our exact patch, in which case a rebase will simply skip our patch. Other times there are slight or major (it might be a completely different design) changes to the patch and then someone typically needs to sort out the patches manually. Mostly though, rebasing works just fine and we don't end up with conflicts.
Now, this whole rebasing process gets a tad boring and repetitive after a while, especially considering we have a dozen of repositories with the setup described above. What I recently did was to automate this using our CI system.
The workflow thus looks like:
- human extracts zip file, git add + git commit on
master+ git push - CI runs for
masterbranch- clones a copy of itself into a new working directory
- checks out
tsbranch (the one with our patches) in working directory - rebases
tsontomaster - push
tsback toorigin
- this will now trigger a CI build for the
tsbranch - when CI runs for the
tsbranch, it will compile, test and save the binary output as "build artifacts", which can be included in other repositories - GitLab CI, which is what we use, has a CI_PIPELINE_ID that we use to version built container images or artifacts
To do this, all you need is a few lines in a .gitlab-ci.yml file, essentially;
stages:
  - build
  - git-robot

... build jobs ...

git-rebase-ts:
  stage: git-robot
  only:
    - master
  allow_failure: true
  before_script:
    - 'which ssh-agent || ( apt-get update -y && apt-get install openssh-client -y )'
    - eval $(ssh-agent -s)
    - ssh-add <(echo "$GIT_SSH_PRIV_KEY")
    - git config --global user.email "kll@dev.terastrm.net"
    - git config --global user.name "Mr. Robot"
    - mkdir -p ~/.ssh
    - cat gitlab-known-hosts >> ~/.ssh/known_hosts
  script:
    - git clone git@gitlab.dev.terastrm.net:${CI_PROJECT_PATH}.git
    - cd ${CI_PROJECT_NAME}
    - git checkout ts
    - git rebase master
    - git push --force origin ts
We'll go through it a few lines at a time. Some basic knowledge about GitLab CI is assumed.
This first part lists the stages of our pipeline.
stages:
  - build
  - git-robot
We have two stages, first the build stage, which does whatever you want it to do (ours compiles stuff, runs a few unit tests and packages it all up), then the git-robot stage which is where we perform the rebase.
Then there's:
git-rebase-ts:
  stage: git-robot
  only:
    - master
  allow_failure: true
We define the stage in which we run followed by the only statement which limits CI jobs to run only on the specified branch(es), in this case master.
allow_failure simply allows the CI job to fail but still passing the pipeline.
Since we are going to clone a copy of ourselves (the repository checked out in CI) we need SSH and SSH keys setup. We'll use ssh-agent with a password-less key to authenticate. Generate a key using ssh-keygen, for example:
ssh-keygen

kll@machine ~ $ ssh-keygen -f foo
Generating public/private rsa key pair.
Enter passphrase (empty for no passphrase):
Enter same passphrase again:
Your identification has been saved in foo.
Your public key has been saved in foo.pub.
The key fingerprint is:
SHA256:6s15MZJ1/kUsDU/PF2WwRGA963m6ZSwHvEJJdsRzmaA kll@machine
The key's randomart image is:
+---[RSA 2048]----+
|            o**.*|
|           ..o**o|
|           Eo o%o|
|          .o.+o O|
|        So oo.o+.|
|       .o o.. o+o|
|      .  . o..o+=|
|     . o ..  .o= |
|      . +.    .. |
+----[SHA256]-----+
kll@machine ~ $
Add the public key as a deploy key under Project Settings -> Repository -> Deploy Keys. Make sure you enable write access or you won't be able to have your git robot push commits. We then need to hand over the private key so that it can be accessed from within the CI job. We'll use a secret environment variable for that, which you can define under Project Settings -> Pipelines -> Environment variables). I'll use the environment variable GIT_SSH_PRIV_KEY for this.
Next part is the before_script:
before_script:
  - 'which ssh-agent || ( apt-get update -y && apt-get install openssh-client -y )'
  - eval $(ssh-agent -s)
  - ssh-add <(echo "$GIT_SSH_PRIV_KEY")
  - git config --global user.email "kll@dev.terastrm.net"
  - git config --global user.name "Mr. Robot"
  - mkdir -p ~/.ssh
  - cat gitlab-known-hosts >> ~/.ssh/known_hosts
First ssh-agent is installed if it isn't already. We then start up ssh-agent and add the key stored in the environment variable GIT_SSH_PRIV_KEY (which we setup previously). The git user information is set and we finally create .ssh and add the known host information about our GitLab server to our known_hosts file. You can generate the gitlab-known-hosts file using the following command:
ssh-keyscan my-gitlab-machine >> gitlab-known-hosts
As the name implies the before_script is run before the main script part and the ssh-agent we started in the before_script will also continue to run for the duration of the job. The ssh-agent information is stored in some environment variables which are carried across from the before_script into the main script, enabling it to work. It's also possible to put this SSH setup in the main script, I just thought it looked cleaner splitting it up between before_script and script. Note however that it appears that after_script behaves differently so while it's possible to pass environment vars from before_script to script, they do not appear to be passed to after_script. Thus, if you want to do git magic in the after_script you also need to perform the SSH setup in the after_script.
This brings us to the main script. In GitLab CI we already have a checked out clone of our project but that was automatically checked out by the CI system through the use of magic (it actually happens in a container previous to the one we are operating in, that has some special credentials) so we can't really use it, besides, checking out other branches and stuff would be really weird as it disrupts the code we are using to do this, since that's available in the git repository that's checked out. It's all rather meta.
Anyway, we'll be checking out a new git repository where we'll do our work, then change the current directory to the newly checked out repository after which we'll check out the ts branch, do the rebase and push it back to the origin remote.
- git clone git@gitlab.dev.terastrm.net:${CI_PROJECT_PATH}.git
- cd ${CI_PROJECT_NAME}
- git checkout ts
- git rebase master
- git push --force origin ts
… and that's it. We've now automated the rebasing of a branch. Occasionally it will fail due to problems rebasing (most commonly merge conflicts) but then you can just step in and do the above steps manually and be interactively prompted on how to handle conflicts.
2 Automatic merge requests
All the repositories I mentioned in the previous section are NEDs, a form of driver for how to communicate with a certain type of device, for Cisco NSO (a network orchestration system). We package up Cisco NSO, together with these NEDs and our own service code, in a container image. The build of that image is performed in CI and we use a repository called nso-ts to control that work.
The NEDs are compiled in CI from their own repository and the binaries are saved as build artifacts. Those artifacts can then be pulled in the CI build of nso-ts. The reference to which artifact to include is the name of the NED as well as the build version. The version number of the NED is nothing more than the pipeline id (which you'll access in CI as ${CI_PIPELINE_ID}) and by including a specific version of the NED, rather than just use "latest" we gain a much more consistent and reproducible build.
Whenever a NED is updated a new build is run that produces new binary artifacts. We probably want to use the new version but not before we test it out in CI. The actual versions of NEDs to use is stored in a file in the nso-ts repository and follows a simple format, like this:
ned-iosxr-yang=1234
ned-junos-yang=4567
...
Thus, updating the version to use is a simple job to just rewrite this text file and replace the version number with a given CI_PIPELINE_ID version number. Again, while NED updates are more seldom than updates to nso-ts, they do occur and handling it is bloody boring. Enter automation!
git-open-mr:
  image: gitlab.dev.terastrm.net:4567/terastream/cisco-nso/ci-cisco-nso:4.2.3
  stage: git-robot
  only:
    - ts
  tags:
    - no-docker
  allow_failure: true
  before_script:
    - 'which ssh-agent || ( apt-get update -y && apt-get install openssh-client -y )'
    - eval $(ssh-agent -s)
    - ssh-add <(echo "$GIT_SSH_PRIV_KEY")
    - git config --global user.email "kll@dev.terastrm.net"
    - git config --global user.name "Mr. Robot"
    - mkdir -p ~/.ssh
    - cat gitlab-known-hosts >> ~/.ssh/known_hosts
  script:
    - git clone git@gitlab.dev.terastrm.net:TeraStream/nso-ts.git
    - cd nso-ts
    - git checkout -b robot-update-${CI_PROJECT_NAME}-${CI_PIPELINE_ID}
    - for LIST_FILE in $(ls ../ned-package-list.* | xargs -n1 basename); do NED_BUILD=$(cat ../${LIST_FILE}); sed -i packages/${LIST_FILE} -e "s/^${CI_PROJECT_NAME}.*/${CI_PROJECT_NAME}=${NED_BUILD}/"; done
    - git diff
    - git commit -a -m "Use ${CI_PROJECT_NAME} artifacts from pipeline ${CI_PIPELINE_ID}"
    - git push origin robot-update-${CI_PROJECT_NAME}-${CI_PIPELINE_ID}
    - HOST=${CI_PROJECT_URL} CI_COMMIT_REF_NAME=robot-update-${CI_PROJECT_NAME}-${CI_PIPELINE_ID} CI_PROJECT_NAME=TeraStream/nso-ts GITLAB_USER_ID=${GITLAB_USER_ID} PRIVATE_TOKEN=${PRIVATE_TOKEN} ../open-mr.sh
So this time around we check out a git repository into a separate working directory again, it's just that it's not the same git repository as we are running on simply because we are trying to do changes to a repository that is using the output of the repository we are running on. It doesn't make much of a difference in terms of our process. At the end, once we've modified the files we are interested in, we also open up a merge request on the target repository. Here we can see the MR (which is merged already) to use a new version of the NED ned-snabbaftr-yang.

What we end up with is that whenever there is a new version of a NED, a merge request is opened on our nso-ts repository to start using the new NED. That merge request is using changes on a new branch and CI will obviously run for nso-ts on this new branch, which will then test all of our code using the new version of the NED. We get a form of version pinning, with the form of explicit changes that it entails, yet it's a rather convenient and non-cumbersome environment to work with thanks to all the automation.
3 Getting fancy
While automatically opening an MR is sweet… we can do better fancier. Our nso-ts repository is based on Cisco NSO (Tail-F NCS), or actually the nso-ts docker image is based on a cisco-nso docker image that we build in a separate repository. We put the version of NSO as the tag of the cisco-nso docker image, so cisco-nso:4.2.3 means Cisco NSO 4.2.3. This is what the nso-ts Dockerfile will use in its FROM line.
Upgrading to a new version of NCS is thus just a matter of rewriting the tag… but what version of NCS should we use? There's 4.2.4, 4.3.3, 4.4.2 and 4.4.3 available and I'm sure there's some other version that will pop up its evil head soon enough. How do I know which version to pick? And will our current code work with the new version?
To help myself in the choice of NCS version I implemented a script that gets the README file of a new NCS version and cross references the list of fixed issues with the issues that we currently have open in the Tail-F issue tracker. The output of this is included in the merge request description so when I look at the merge request I immediately know what bugs are fixed or new features are implemented by moving to a specific version. Having this automatically generated for us is… well, it's just damn convenient. Together with actually testing our code with the new version of NCS gives us confidence that an upgrade will be smooth.
Here are the merge requests currently opened by our GitBot
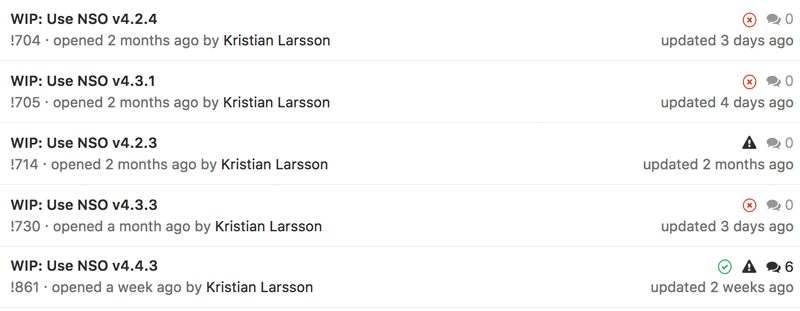
We can see how the system have generated MRs to move to all the different versions of NSO currently available. As we are currently on NSO v4.2.3 there's no underlying branch for that one leading to an errored build. For the other versions though, there is a branch per version that executes the CI pipeline to make sure all our code runs with this version of NSO.
As there have been a few commits today, these branches are behind by 6 commits but will be rebased this night so we get an up to date picture if they work or not with our latest code.

If we go back and look at one of these merge requests, we can see how the description includes information about what issues that we currently have open with Cisco / Tail-F would be solved by moving to this version.
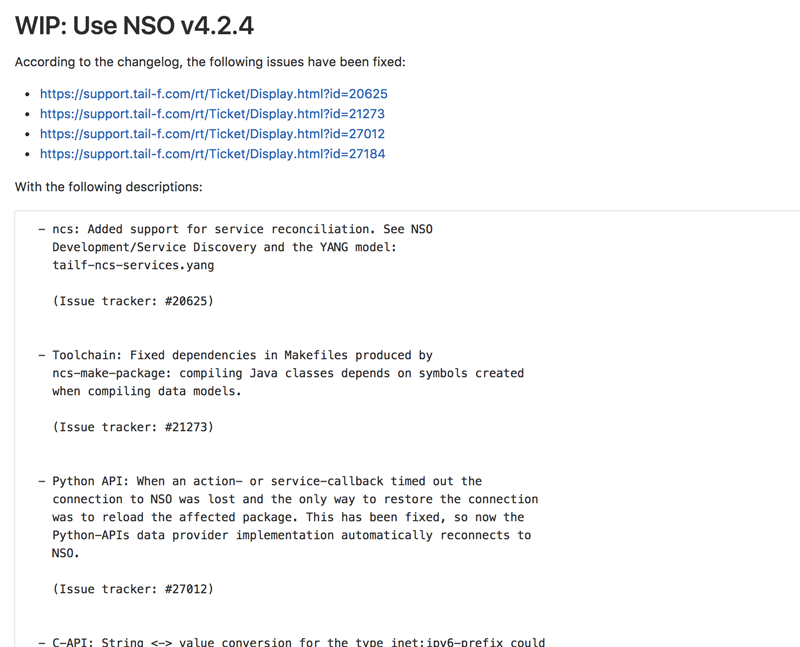
This is from v4.2.4 and as we are currently on v4.2.3 we can see that there are only a few fixed issues.
If we instead look at v4.4.3 we can see that the list is significantly longer.
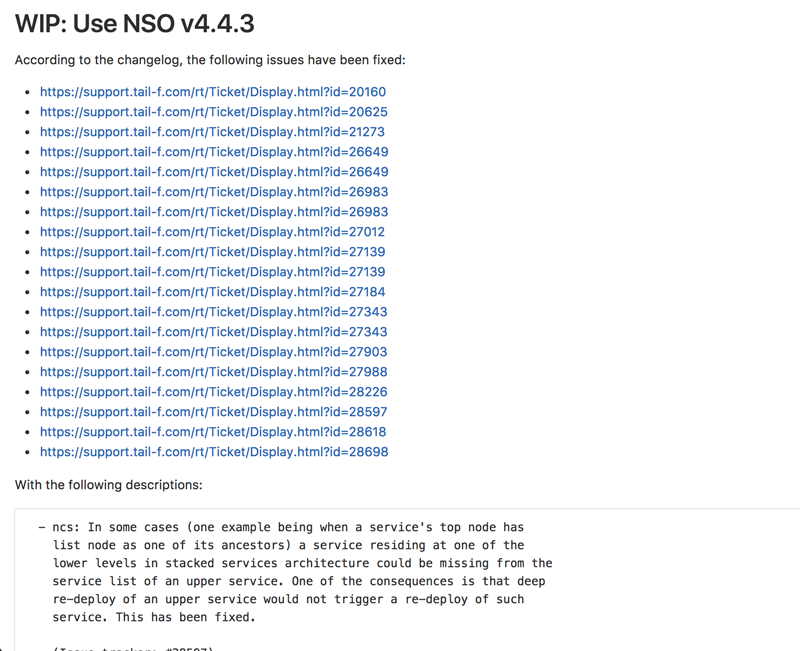
Pretty sweet, huh? :)
As this involves a bit more code I've put the relevant files in a GitHub gist.
4 This is the end
If you are reading this, chances are you already have your reasons for why you want to automate some git operation. Hopefully I've provided some inspiration for how to do it.
If not or if you just want to discuss the topic in general or have more specific questions about our setup, please do reach out to me on Twitter.
NFV-Style DDoS mitigation using Snabb Switch
My employer arranged for a hack day last month. It meant anyone participating was free to hack on anything they wanted and at the end of the day we got to present our work during a 2 minute flash presentation to our colleagues as well as a number of students from KTH's (Royal institute of technology) computer science program.
Together with my colleague, Johan Törnhult, we set out to build a simple DDoS mitigation application. I had previously looked at Snabb Switch and have followed the project, albeit from a distance, for quite some time. This was my chance to get acquainted with it and try out my programming skill set at Lua, a language I had never touched or even seen before.
In its essence, Snabb Switch is a framework to offer developers or network engineers with some programming skills (like me) to build their own packet forwarding logic. Code is packaged into "apps" and multiple apps can be linked together in a graph. You can't call Snabb a router or a switch because out of the box it neither routes or switches packets. With a minimal configuration you can have it forward packets (verbatim) from one port to another but as soon as you want to do something more advanced you would need an app.
Snabb comes with a number of apps, ranging from very small apps to replicate incoming packets over multiple outputs or read a pcap file and send over the network to more complete implementations like a VPWS app to build L2VPNs over an IP network.
There is definitely some room for improvement as far as the documentation for Snabb goes. It's a fast moving project, still in its relatively early life, which means some documentation is out of date while most of the documentation hasn't been written yet. Mostly by reading the code of other apps and some of the existing documentation I managed to forward my first packet through Snabb.
My intention was to implement a source host blocking mechanism that would block any host sending over a specified amount of packets or bytes per second and a few hours after my first unsteady steps I had my first working implementation. Performance was horrendous and it wouldn't recognize IPv6 packets correctly instead assuming everything to be IPv4. I did manage to find a library to apply BPF filters (the same you use to specify a filter with tcpdump) on a packet which I used to define rules. A rule has a traffic pattern to match and a pps and bps threshold. Once a source host exceeds the threshold for a rule it will be completely blocked for a certain amount of time.
The test machine used managed to push some 300Kpps of packets and over the next day or two I managed to tweak a few things to raise performance. One really comes to understand how crucial it is for performance to keep down the amount of code executed and the amount of data copied between various places. My first change was to use a library to parse the headers of the packet, first looking at the ethertype of the Ethernet header to determine if it was an IPv4 or IPv6 packet and after that to extract the source IP address from the packet. While I achieved support for IPv4 and IPv6, this parsing library proved to be fairly slow and instead I moved to just extracting the few bits that represent the ethertype and after that got the source IP address. Extracting the address used ntop (network to presentation) to convert 4 or 16 bytes to a string representation of the IP address. Again this is slow and simply having an IPv4 address represented as a uint32_t using Lua FFI (allowing C data structures within Lua) proved to be an order of magnitude faster.
I'm now up to around 5Mpps in real packet forwarding on a single core, when the majority of packets are being blocked. A selftest on my laptop, which is a fair bit slower than the "real" test machine, does 10Mpps which is somewhat surprising. Instead of receiving packets on a NIC, processing using my logic and sending to the next NIC (or dropping) it will read packets from a pcap file and continuously loop those packets into my app. I wouldn't have guessed the overhead surrounding handling real NICs would be that large.
Arbor implements something very similar in their TMS and Pravail series of products, which they call "Zombie Detection". 10Gbps/5Mpps of performance is in excess of $125k from Arbor while my x86 PC with 4 cores can do twice that for just under $2500 - that's two orders of magnitude cheaper, no surprise NFV is gaining traction. I know my comparison isn't fair but it just comes to show what can be done and what the future might hold.
You can find the code for the DDoS source blocker at GitHub/plajjan/snabbswitch. Reach out to me on Twitter if you want to ask me anything about it or discuss how to take it further - I would love someone to collaborate with :)
If you are interested in writing packet forwarding logic and haven't looked at Snabb Switch yet, I recommend you to do so - it is surprisingly easy to get going with!